Books packed? Check. Kitchenware packed? Check. Clothes packed? Check. But, you look into your office and the music from a horror movie plays in your head. The computer stares at you, taunting you – “Go ahead pack me, I’ll never come back to life again.” The computer is one of the last things to be packed before a move as no one wants to disconnect this lifeline. You’re filled with the dread of trying to fit each computer piece into boxes and the horror of not being able to set it back up correctly in your new place. Thankfully, with these tips your entire computer will fit into one box. Also, you can put an end to the scary visions of endless tangled wires and the confusion of not knowing where to plug each cord. Simply color-code your computer wires and use your cell phone camera to document the process. Here is how to tame your computer:
Step 1: Prepare to Pack Your Computer

- Get the Proper Gear – Visit your local office supply store and purchase colored dot stickers and colored Velcro cord wraps.
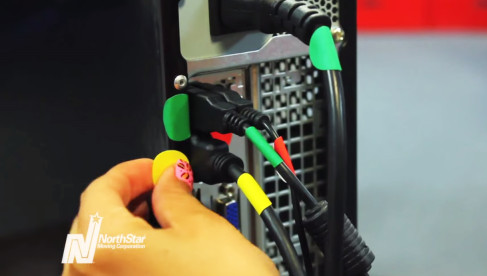
- Label – BEFORE unplugging your computer wires: neatly wrap each wire with a different color cord sticker. Label each corresponding input with a colored dot. Match the color of the sticker wrapped around the cord to the color of the input dot. For example, place a green dot next to your mouse input on your computer and place a matching green sticker wrap around your mouse cord. You simply match the colors when you are setting your computer back up. Always label both ends of each cord with the same color dot.
- Photograph- BEFORE you unplug. Use your camera and snap a shot or two of your color-coded work.
- Unplug – After you have colored labels on all of your cords and inputs, properly shut down your computer. Then unplug all of your cords from all inputs.
- Organize – Before packing up a cord, place a Velcro colored wrap around one end of the cord. Use the same color Velcro wrap as the dot sticker already placed on the cord. Then gently and loosely wrap the cord in a circle around your hand. Once you have wrapped it, secure it with the Velcro wrap. Using Velcro cord wraps will better secure your cords during your move as well as prevent them from tangling.
Now you will be able to channel your inner geek and set your computer back up like a nerdy computer pro! Next up, packing your computer into one box to keep all those cherished files safe and undamaged.
Step 2: Pack Your Computer in a Single Box
- Get the Proper Gear – To securely pack your computer use a dishpak box. Dishpaks are specially designed boxes to handle and protect fragile items. You can find dishpaks at moving companies, box stores and home improvement stores. If you can’t find dishpaks, use double corrugated boxes. You will also need lots of recyclable packing paper, bubble and packing tape.
- Assemble – Put the box together. Place double packing tape on the bottom of the box over the opening and across the middle. Then double tape the perimeter for extra support.
- Pad – After taping, pack the bottom of the box with crumbled packing paper for padding.
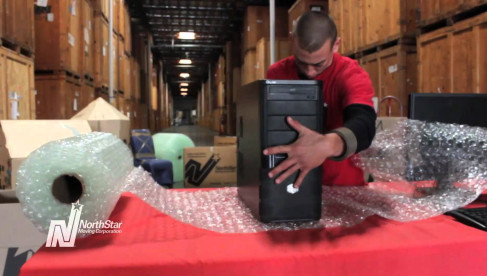
- Wrap – Always pack your heaviest items first, so pack your computer tower and monitor first. Wrap these two items separately. Lay your bubble on a flat surface with the pop side facing up. Place your computer tower standing up right on top of the bubble. Pull the wrap over and tape it all together. Repeat by laying the tower on its side and pulling the bubble over the sides. Keep taping until the wrap is securely tight to the tower and on all sides. Make sure the tower is completely covered. Place it up right, vertically in the box. Lay more bubble on the flat surface with the pop side facing up, and then lay down your monitor. Wrap and tape the entire monitor in bubble wrap. Then place it vertically in the box next to the computer tower.
- Stuff – Before packing your keyboard, mouse and speakers, stuff packing paper in open spaces between the tower and monitor to ensure they cannot shift. Pack some paper on top for extra cushion.
- Pack Accessories – Wrap your keyboard and mouse in packing paper before placing them in the top of the box. Then wrap up your carefully color coded computer wires in packing paper. Tape the paper around the wires to secure them and then place them on the very top of the box. Fill the rest of the box with crumpled packing paper. Be sure to label the wrapped up items with a pen: “cords,” “mouse,” etc. so they don’t get mistaken for the crumbled up packing paper.
- Tape & Label – Tape the box shut by double taping over the opening and across the middle. Then double tape along the top perimeter of the box for extra security. Label the outside of the box with the contents and the room the computer should be moved into. Make sure to mark FRAGILE on all sides of the box.
Step 3: Match the Colors and Enjoy!
Done! Now you’re ready to go on the real highway and soon be back surfing on the super highway. You’re computer is safely packed and organized in one box! Ready to get back on-line? Just carefully unpack each component, refer to your photos on your camera and let your color codes lead you safely back to cyber space. Check out this video to see these tips in action.
About Laura McHolm and NorthStar Moving Company
Laura McHolm is co-founder of NorthStar Moving Company and an organizational and storage expert. NorthStar Moving Company specializes in providing eco-luxury moving and storage services.
Note: This is a guest post; the views and opinions expressed are those of the author and do not necessarily reflect the opinion or position of Redfin.


 United States
 Canada