Confession, I am a decora-holic. Home Goods is my happy place. My unwavering loyalty to IKEA has almost earned me Swedish citizenship. I replace my furniture about as often as Kim Kardashian takes a selfie but on a pre Keeping Up with the Kardashians budget, which is why I love finding affordable pieces that I can tailor to fit my personal style and decor (whatever it happens to be this month).
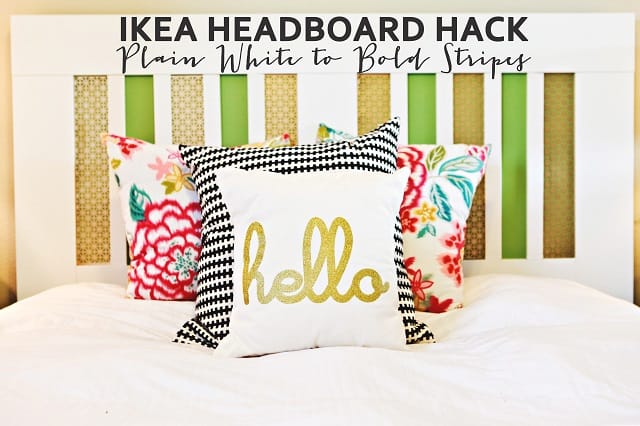
Have you ever spent much time at IKEA? That’s kind of a trick question, since it is almost physically impossible to enter the store even one time without spending the next 5+ hours there (whether by choice or because you get lost makes zero difference). They have a restaurant … in a furniture store. You can buy a $1 ice cream cone to keep your blood sugar up while you debate which fabric to turn into a new set of curtains. An afternoon at IKEA is to DIYers what a Justin Bieber concert is to middle school girls, and it’s where I gleefully I found my next furniture victim project: an IKEA headboard hack.

What You’ll Need for this IKEA Headboard Hack:
- IKEA Brimnes Headboard – $110
- 24 in. x 36 in. Union Jack Aluminum Sheet Metal in Brass – $20 (available here and here)
- Paint color of your choosing (for this project, I used Valspar Green Clover #6005-8B – price will vary)
- White wood trim cut into eight 1 ¾ in. x 19 in. slats (I purchased and cut the trim at Home Depot – price will vary)
- Straight-edged tin cutters
- Strong all-purpose adhesive (suitable for both metal and wood)
- Tape measure or yard stick

You’ll want to start this project by removing and organizing all the pieces of the IKEA Brimnes Headboard from the box (an ungodly task, I know, I know). It seems like a given, but the last thing you want is to realize halfway through the project that you painted the wrong piece of wood. Do I speak from experience? I cannot say … but a “friend of a friend” would offer that nothing screams DIY-gone-awry like a random baseboard painted bright green (“but it’s abstract,” you try arguing).
Specifically, we are looking for the two large identical square slats of wood that will make up the front of the headboard, as seen in our “before” picture. There are only two in the box, so unlike most IKEA sets, this is not like finding a needle in a haystack.

Using the color of your choice, use a roller or paintbrush to paint the two square slats of wood. I used two coats of Valspar Green Clover #6005-8B.

Next, it’s time to prepare our Union Jack Aluminum Sheet Metal in Brass. The thing I love about this metal is that it 1) is easy to cut with a pair of straight-edged tin cutters, 2) is available in a wide array of patterns and colors and 3) looks pretty darn snazzy and adds some great texture. I chose the ‘Union Jack’ pattern in Brass for this headboard, but you can easily search Home Depot or Amazon to find the perfect pattern and color to accent your decor.

Using a tape measure and the wire cutters, carefully measure and cut six, 3 ½ in. x 19 in. strips from the metal, making sure to follow the natural edging of the sheet metal for a clean, straight edge.


While the paint continues to dry, start assembling the IKEA Brimnes headboard (or if you are anything like me, enjoy a glass of Pinot Grigio FIRST and THEN start assembling). I went ahead and assembled the shelves in advance too while waiting for my second coat of paint to dry, but the part we want to focus on right now is the headboard frame itself.


With the main frame assembled and the painted wood slats completely dry, slide the slats into the frame and secure the wood across the top as instructed in the IKEA manual.


Using a tape measure, find and lightly mark in pencil the center of each of the painted wood slats.This will determine the placement of our sheet metal in the next step.


Using a strong, clear drying all-adhesive glue that is suitable for both metal and wood, secure the cut metal sheets to the painted wood slats, using three pieces of sheet metal to create a striped pattern on each side of the headboard. Within each painted wood slat, two pieces of sheet metal should be pushed flush against either side, while the remaining piece will be secured in the center at the spot previously measured and marked.


Using the strong all-adhesive or a wood glue, use the precut 1 ¾ in. x 19 in. white wood trim slats and secure them in alignment with each piece of sheet metal, making sure the wood overlaps the sheet metal ever-so-slightly to cover any raw metal edges. Essentially, we are creating a “frame” for each piece of sheet metal, so each side of the headboard will require four pieces of the white wood trim to complete the look.


After securing the sheet metal and wood trim to the headboard, allow to dry completely before finishing the headboard assembly as instructed in the IKEA manual, which is arguably the hardest part of this entire project (but really, who knew cartoon pictures could be as difficult to interpret as a foreign language?).

And ta-da! A revamped headboard that perfectly complements a tailored color scheme and style. This project is fun, easy to complete and, most importantly, provides a stylish punch without the hefty price tag of customized furniture. Go ahead and splurge on those extra throw pillows and new down comforter to complete your bedroom revamp — I promise I won’t tell!


What do you think of this IKEA headboard hack? What are some of your favorite IKEA items to update? Let me know in the comments below!

Alyssa Ennis is on the public relations team at Redfin. An avid DIY-er and part-time wedding photographer, when Alyssa’s not at Redfin’s Seattle headquarters you can typically find her in the backyard of her apartment complex working on yet another project with hammer in one hand and a camera in the other.
Other popular posts:
1. How to Protect Your Home From Forest Fires
2. The Ultimate Guide to Keep Summer Pests Out of Your House
3. How to Create a Safe Space at Home When Your Kids Reach Sensory Overload


 United States
 Canada